
I have been canning—or jarring—salmon for the last four years. I’ve learned all of what I know from reading books and lots of practice. So much practice that I’ve won two blue ribbons at the Salt Spring Farmers’ Institute Fall Fair for my smoked canned salmon!
While freezing vacuum-sealed fish can extend its “best by” date for up to a year, properly canned salmon stored at room temperature can last three years or longer. I also appreciate the convenience of a half pint jar of salmon—anyone in my family can open a jar and eat delicious salmon without any fuss. It’s also much more convenient to give canned fish to friends and family—you can take your salmon anywhere! Also, you have a mostly reusable container: The glass jar and screw bands can be washed and put to use with your next batch of salmon.
Ready to give it a try?
You’ll need the following equipment:
- Pressure canner: A wide variety of pressure canners are available. The size of the canner will dictate how many jars you can cook at one time. I’ve got the All American 21½-Quart Pressure Cooker/Canner, so that I can can lots of smaller half-pint jars or larger soup-sized jars. Larger canners can run $400 or more, while smaller canners can be found for $100 to $200.
- Canning jars with lids and bands:There are a few varieties of jars suitable for canning. A dozen half-pint jars with lids and rings typically costs $12 to $15. The glass jars and screw bands can be reused several times over, but you’ll need new lids for each canning session.
- Heat source: You’ll need to supply heat to your pressure canner for around two hours. As I use a larger canner that can be quite heavy when fully loaded, I don’t risk using it on my glass-top electric stove. Instead, I use an outdoor portable stand for a propane tank and burner.
And of course, you’ll need some fresh or freshly thawed salmon or smoked salmon to put into your jars. I exclusively jar smoked salmon, as the brine and smoking process also aid the preservation process and automatically “prep” your fish without any further additives. If you don’t want to brine and smoke your fish prior to canning, you’ll need to soak your salmon for at least one hour in a salt brine using a ratio of 1 cup of salt to 1 gallon of water.
Overview of brine and smoke process prior to canning:
- Prep a “full-flavour” brine that matches your taste preferences. I’ve mixed and matched various brine recipes to use a combination of filtered water, soy sauce, non-iodized salt, brown sugar (or maple syrup or honey), dry white wine, whole cloves of garlic (and/or freshly sliced ginger) with cracked or whole peppercorns and hot sauce/spices. I prefer to stir brines on the stove to fully dissolve all salt and sweeteners. If you do heat your brine, make sure to fully cool the brine before soaking the fish.
- Before you brine, fillet your salmon into chunks that will work well with your preferred jar size.I will usually line up the side of the jar with the fillet to cut strips from the fillet. Subtract about 3/4“ or 1” from the height of the jar when sizing up the fillet—the fish should not touch the top rim of the jar. As salmon are oily fish, any oil that reaches the lip could prevent the lid from sealing properly. I also remove all scales. Fish scales don’t particularly impart great flavour to your fish, especially while brining.
- Brine the sliced fish for 8 to 10 hours in a sealed container in the refrigerator. The longer your fish brines, the better. You can do shorter brines if you’re pressed for time, but the salmon won’t soak up as much flavour.
- Remove the fish from the brine and quickly dip each piece into a bowl of fresh water. I prefer to use filtered water to avoid any chlorine or other hard water taste on the fish.
- Place each fish piece skin-down onto a rack that fits in your smoker. Use paper towels to gently soak any water from the top of the fillet chunks.
- Allow a nice pellicle, or skin, to form on the fish while drying under a fan for two to three hours, preferably in the shade where the air temperature is cooler.If outdoors, the fan will also prevent any wasps or flies from landing on your salmon. You can also air dry in a refrigerator overnight, but this process takes longer.
- Once a pellicle has formed on the fish, smoke the salmon for up to three hours with as little heat as possible. Because your salmon will fully cook in the pressure cooker, you don’t want to dry out the salmon in the smoker. You simply want to impart your preferred amount of smoky flavour to the fish. In my Big Chief smoker, I typically vent the lid to allow more heat to escape, and I cycle through three full pans of maple chips, approximately one pan per hour. Check your salmon frequently to ensure that it is staying somewhat soft and not drying out.
- Remove the rack(s) of smoked salmon from the smoker, and allow to cool for about 20 minutes before handling.
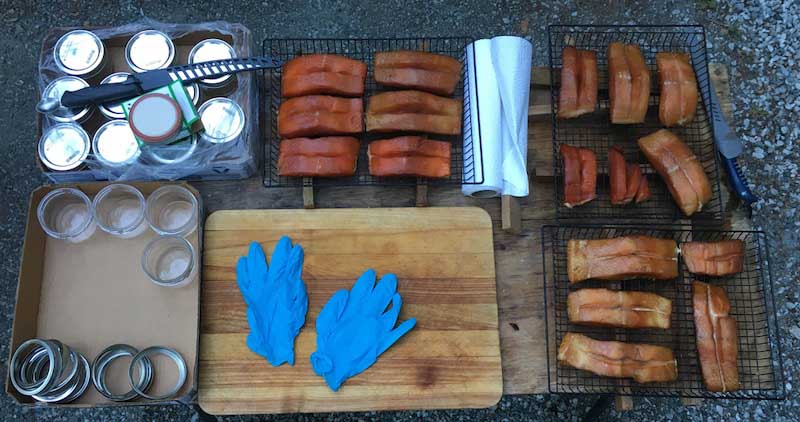
At this stage, you can prepare your work surface to allow for faster processing, as shown in Figure 1. If you purchased brand news jars with lids and bands, remove the lids and bands from the jars. You may want to warm up the lids in a hot water bath prior to stuffing the jars, but I find that this step is not always necessary. Make sure jars are clean—you don’t need to wash your jars if they’re brand new. Arrange your smoke racks around a cutting board and your collection of jars and lids. I prefer to handle the smoked salmon with nitrile disposable gloves, which minimizes spreading fish oil to other surfaces.
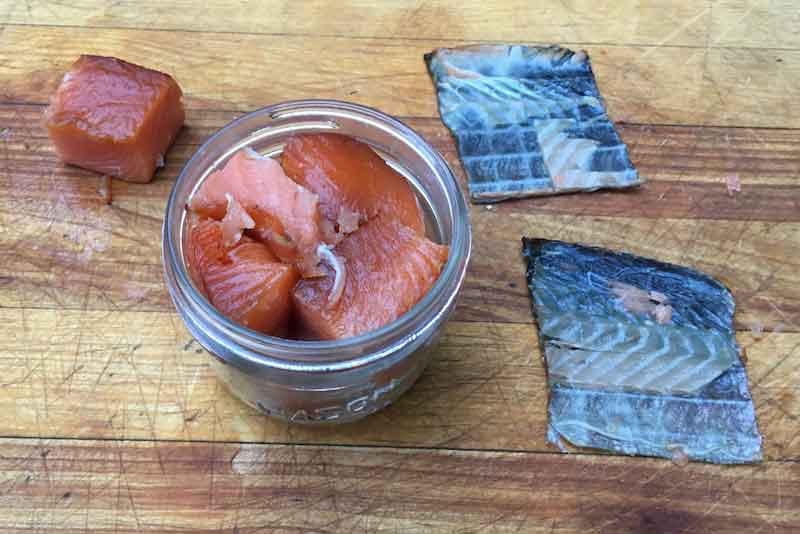
Start placing the smoked salmon into the jar. I usually cut each vertical strip that I made from the initial fillet in half so that I can more easily spread the fish into the jar. Avoid mashing your perfectly sized salmon into the jar. I also remove the skin from the fillet chunks before placing in the jar. I find that the skin from smoked salmon can become particularly “thin” and goopy during the canning process, and is difficult to remove from the salmon prior to eating. If the skin is thick enough, I’ll usually place the skin as a liner at the bottom of the jar before I add the fish for a bit of added flavour. Remember to leave some room at the top of the jar, as shown in Figure 2.
Before placing the lid and band on the jar, thoroughly wipe the lip of the jar with a dry paper towel. I usually continue to wipe the lip until I hear the paper towel squeak on the surface. Place the lid on the jar, and screw the band on the jar “thumb tight”. You can be fairly tight, but you don’t need to knuckle bust the band as air needs to escape from the jar during the canning process to create a proper vacuum. Repeat the process of filling up each jar until all of your salmon is jarred.
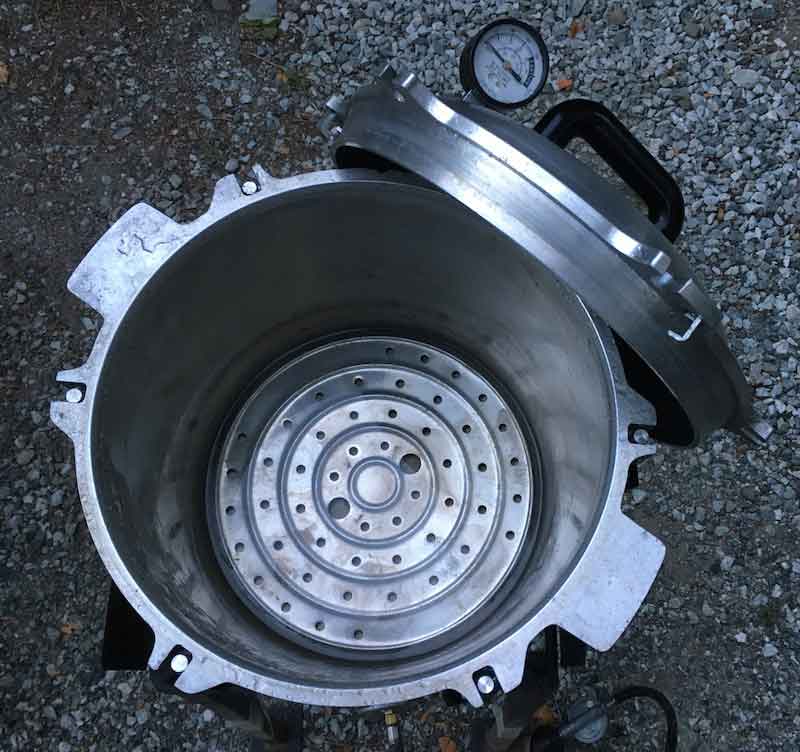
Begin preparing the pressure canner by placing a canning rack at the bottom of the canner, as shown in Figure 3. (Your canner likely came with one or two racks on which to place jars.) Do not place jars directly on the bottom of the canner as jars will likely explode from the direct heat.
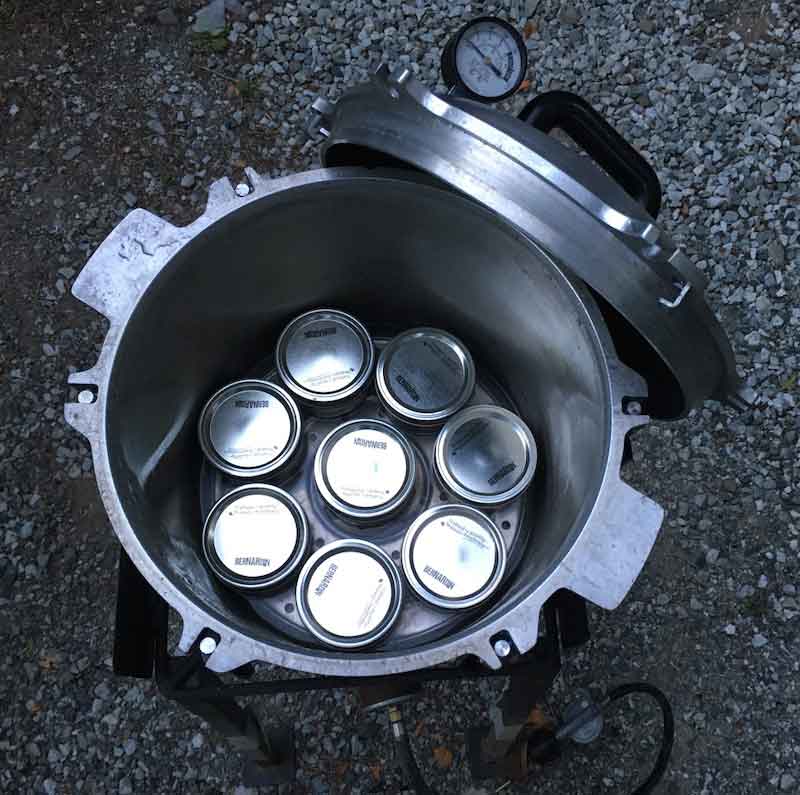
Place jars on to the canning rack. Fill the entire surface area of the canning rack as shown in Figure 4.
Before stacking another rack into the canner Figure 5, add water to the canner. Fill the canner with at least an inch to 1 ½ “ of water. With half-pint jars, the water should just reach below the screw bands.
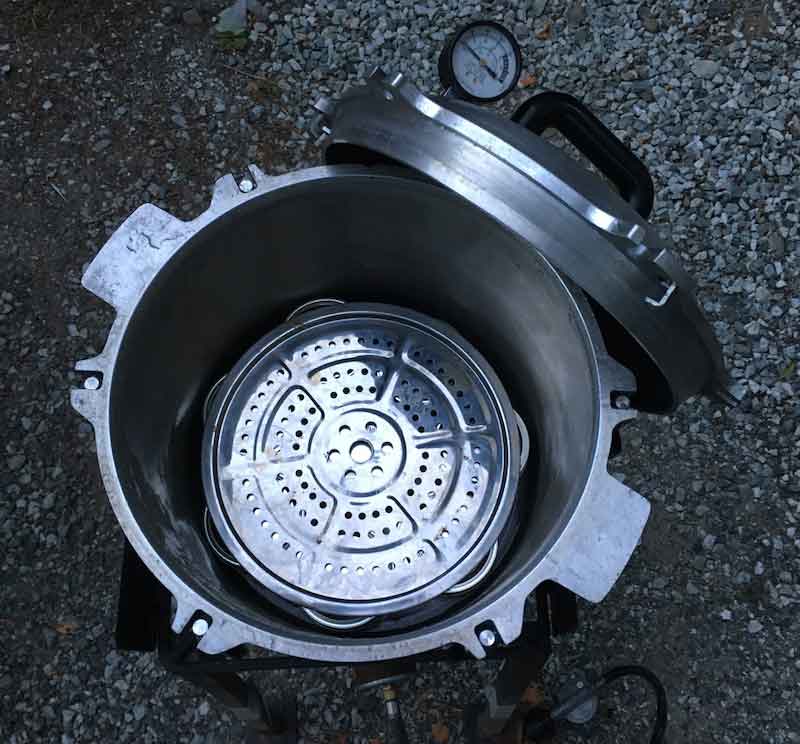
Once all of your jars have been placed on to racks within the canner, wipe the inside lip of your canner with a light coat of vegetable oil. I usually spray some Pam on to a paper towel. Properly place and tighten the lid of the pressure cooker per the directions that came with your canner.
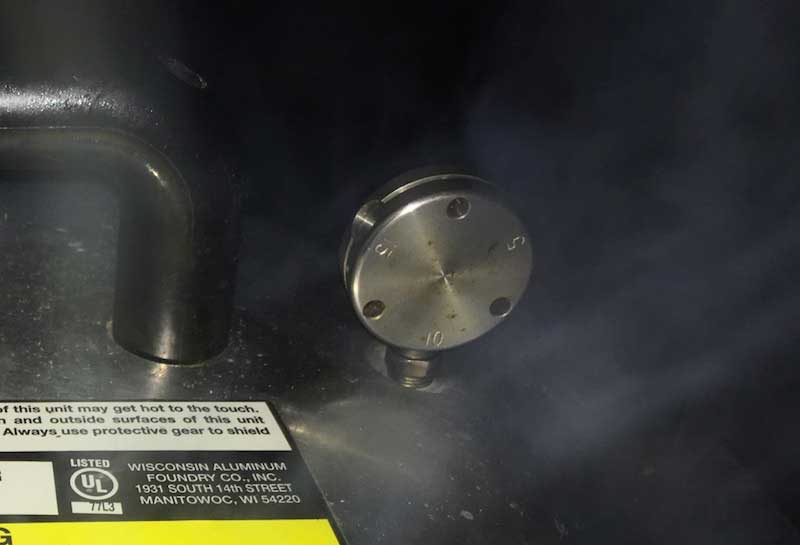
After your pressure cooker has been loaded and sealed, turn your burner to high heat and bring the water to boil. At this point, allow the steam to vent from the canner’s relief valve. Once the steam has vented for a few minutes, place the rocker weight on the relief valve (wear an oven mitt during this operation to avoid burning your hand!). The rocker weight design will vary by manufacturer, but generally speaking, you will have a specific setting for your rocker weight to achieve the desired pressure in your pressure cooker. My canner’s rocker weight has three holes around its side, one for each pressure weight: 5 lb, 10 lb, and 15 lb Figure 6. For canning salmon, your canner needs to reach 10 lbs of internal pressure.
Once the rocker weight is in place, continue to use high heat. Watch the pressure gauge on your canner—when it reaches 10 lbs, start to slowly turn down the heat. You want to maintain 10 lbs of pressure for the next 100 to 120 minutes. If the pressure dips below 10 lbs at any point, you may need to restart your timer. The rocker weight should occasionally rock and vent steam when properly tuned. If the rocker weight continuously “rocks,” you’re exceeding 10 lbs of pressure and should slowly reduce heat. You shouldn’t have to continuously monitor the heat—if the pressure gauge and rocker weight are holding steady after 10 minutes at the same heat setting, you’re likely good to go.
After you have cooked the salmon for 100 minutes (I cook for as long as 120 minutes), you can turn off the heat and remove the rocker weight from the pressure vent—again, use an oven mitt! Once the pressure gauge reads zero and steam is no longer venting, it’s safe to remove the lid from canner; I often let it sit overnight before removing the lid. As cool air rushes into the canner, you may start to hear your lids “snapping” into place as a vacuum is created within the jar. Remove the jars from the canner after they have cooled down.
Inspect each jar by removing the screw band and checking for a tight seal on each lid. Jar lids have a center spot that clicks up and down if there is no vacuum in the jar. If you can’t click the center spot, then you have a proper seal on the jar.
If you have any jars that did not properly seal during the canning session, you have two options: Refrigerate the jar and eat the salmon within a few days, or repeat the pressure canning with any unsealed jars. Be sure to re-clean the lip of the jar and use a fresh lid for any repeat attempts.
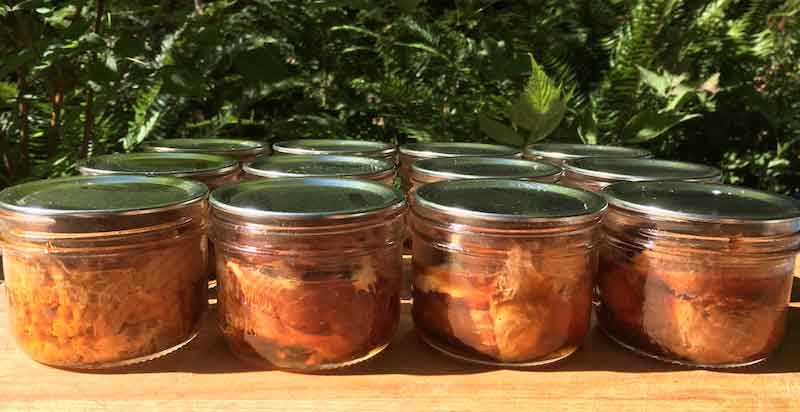
When you’re finished, you should have a collection of canned salmon to enjoy for the months ahead!


Hi, im folloowing your recipes right now for a bunch of Humpies my kids caught, never having canned before , so am appreciating your instructions, hwever im curious as to the reason for removing scales, when you will be taking the skin off later in the process? Anyway, I’ll probably rremove the skin after the brine as i want to have full skins for tanning, … im smokin them full fillets . then will cut them to size.
Thanks for the great instruction
Hi David, thanks for leaving your feedback, and so happy to hear you enjoyed (and still may be enjoying) the pinks this season! They are so much fun, especially on a casting line with a small buzz bomb while trolling with the downriggers—always an unexpected hit for any of my charter guests. The scales’ flavour is being contributed to the brine when you’re soaking your salmon pieces, and I’m fairly certain most people (myself included) wouldn’t eat a teaspoon a fish scales by choice. I can taste a more “fishy” taste (or scaly taste in this instance) when friends of mine share their smoked salmon with me, and they’ve kept the scales on in the process. It’s been a while since I’ve purchased salmon at the store, but I don’t recall ever seeing scales on a salmon filet in a store-bought piece of salmon. Of course, in the end, it’s just a matter of preference and sensitivity to it. And do a comparison and post it if you have the time! Thanks again for sharing your comments.
Hi, how much salt do you add for “full-flavour” brine?