

I have been a recreational and professional shooter and shooting instructor for many years now and over those years certain comments have consistently come to my attention. Some of the most common remarks I hear from other shooters, both novice and experienced are: “I can’t get a consistently good group” or “I’m not a very good shot even though I practice a lot”. I feel sorry for most of these poor souls because, barring a faulty firearm or poor ammunition, somewhere along the line they’ve failed to learn the basics of good shooting, including how to use the proper shooting positions.
There are five basic shooting positions: from a rest, prone, sitting, kneeling, and off-hand (standing). Each has its place both on the range and in the field. It is important to remember that when hunting, you should always try to shoot from the most stable position for which the situation allows. Many hunters, myself included, often shoot offhand when it is possible to kneel, sit or even lie down. The best killing shots are made from the most stable position.
Shooting from a rest is the simplest and most stable position. Unfortunately, unless you are shooting over completely open terrain you don’t often get the opportunity to put it to use in the field unless you use a monopod or bipod support. A rest can be as sophisticated as a lead sled on a bench at the range or as primitive as a rock, stump or downed log in the bush. To shoot from a rest you must remember one basic rule: never rest the rifle directly on the support itself. Whether you are in the field or at the range this always applies. Many shooters make this mistake time and time again. They lay the fore stock, or worse yet the barrel, directly on the rest and shoot. This causes their shots to go high. Compounding the problem, shooters who sight their rifles in like this and then venture afield end up shooting low and can’t understand why.
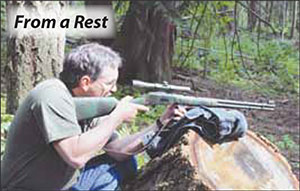 When you fire a rifle while resting it on a hard object the recoil causes the muzzle to jump because the hard rest is unable to absorb the shock of the recoil. The shooter adjusts the sights to compensate for this jump and then shoots from a different position only to discover that the rounds are now landing low. After playing with the sights for an hour or so the person usually becomes so frustrated that they simply assume they are poor shots or that something is wrong with their firearm and give up. All they need to do is to place something soft (like their hand or a soft jacket) between the rifle and the rest.
To shoot correctly from a rest simply grasp the fore stock with your left hand (assuming you shoot right-handed), palm up, and then place the back of your hand on the rest. If you’re using a block or something similar, move your hand forward until the bend in your wrist just touches the edge of the block. Now you can shoot without worrying about the rifle jumping off the rest; your hand will absorb the shock. You can also use a shirt, jacket, pack, or anything else soft to cushion the firearm and eliminate jump. However, you often cannot shoot from a rest when in the field; grass, stumps or small rises in the ground can render this position useless. You must, therefore, adopt a different position, one that provides the greatest stability while allowing you to shoot over obstacles. This is where the other four positions come into play.
The prone, sitting, kneeling, and offhand positions are all based upon the premise that a tripod (or three-point stance) is the most stable position to shoot from.
To adopt any of these positions you must first understand some basic terminology: Everyone has a dominant eye, a trigger hand, and what I call a target or lead foot. If you are right-handed, normally your dominant eye is your right eye, your trigger hand is your right hand and your target foot is your left foot; vice-versa for southpaws. Some of you may be right-handed but have a left dominant eye. You must either learn to shoot left-handed or close your left eye if you wish to shoot right-handed.
To determine your dominant eye look at a distant object and, keeping both eyes open, point at the object. While still pointing and looking at the object, close your left eye, then open it and repeat for your right eye. If you have a right dominant eye, when you close your left eye your finger should still line up with the object, but when you close your right eye, your finger should appear to move to the right. If you have a left dominant eye, just the opposite applies. Repeat this procedure several times using different objects until you get a consistent result. Your trigger hand is always the same as your dominant eye and your target foot is always the opposite of your dominant eye (unless you plan on closing your dominant eye to shoot with your other hand, as I mentioned earlier). That is all the terminology you need to know.
NOTE: I will describe the various methods of adopting these positions assuming you are right-eye dominant and shoot right-handed. If you shoot left-handed then substitute the opposite hand or foot where applicable.
The Prone Position:
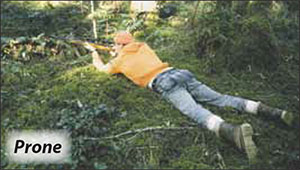 The prone, or lying, position is the most stable shooting position next to a rest. To adopt the prone position start by grasping the firearm in your trigger hand at the rifle’s point of balance (the trail carry). This allows constant muzzle control while moving from standing to lying down. Take an easy pace forward towards the target with your target foot and extend your left hand out in front of you, towards the ground. Bend your knees and lean forward, placing your left hand on the ground and transferring your body weight onto your left hand and right (or non-target) foot, thus freeing your target foot to move under you. Slide your target foot straight back and roll onto your left hip allowing your weight to rest on that hip. Keeping the muzzle toward the target, bring the firearm forward, extend your right leg, and roll onto your stomach. Keeping your right leg extended straight back, open up your left leg to about a 30-degree angle. Bring your left arm forward and grasp the fore stock in your left hand. Raise the rifle to your shoulder while moving your trigger hand back to the pistol grip of the rifle. Place your left arm comfortably under the rifle and rest your elbow on the ground. Your right elbow should now rest on the ground naturally while supporting the rear stock in your cheek. You are now ready to shoot. Years ago, shooters were instructed to turn their entire body at a 30 degree angle to the direction of fire. This has since been changed. The old position did not get the shooter’s body mass behind the recoil and this very often resulted in sore shoulders and poor groupings. If you adopt the position as I have described it you will notice that you can draw a line from the muzzle of the rifle straight down your body to your right foot. This places a much greater amount of your body mass behind the recoil. If the terrain allows it, this is an excellent position to shoot from. Unless you are on a grassy hilltop or someplace similar however, there are going to be obstacles in the way. If this is the case you should consider using the sitting position.
The Sitting Position:
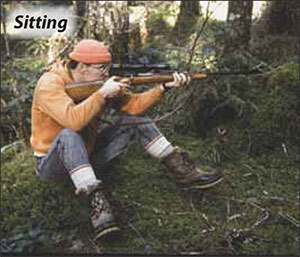 To adopt the sitting position, again grasp the rifle in the trail carry and take a comfortable step towards the target with your target foot. Extend your left hand down below your left buttock, bend your knees and, placing your hand on the ground, take up your weight on your left hand. Then, keeping your target foot pointed at the target, sit down with your knees bent and your feet flat on the ground. You will notice that your body is at about a 30-degree angle to the target with your target foot forward; this is how it should be. Adjust your right (non-target) foot out to about a 30-degree angle from your target foot and raise the firearm to the shooting position by taking the fore stock in your left hand, grasping the pistol grip with your trigger hand, and raising the stock to your cheek as you rest your elbows on your knees.
If you examine your knees while they are bent you will see little dips to the inside of your kneecaps. It is very important that you ensure your elbow joints are in front of your knee joints and that your elbows settle in these little notches between your kneecaps and your quadriceps muscles. This avoids bone to bone contact, preventing muzzle jump when you fire (similar to the situation described earlier on the bench rest). The reason your elbows are forward of your knees is to ensure that your body is leaning forward into the shot. This serves a twofold purpose: first, your body will now absorb the recoil straight back thus preventing the shot from going high, and second, it shifts your weight forward and stops the recoil from pushing you over onto your back. The sitting position is a relatively stable one and will allow you to clear many of the low obstructions that will foil a shot from the prone position. If you still encounter obstacles blocking your path you’ll have to try kneeling.
The Kneeling Position:
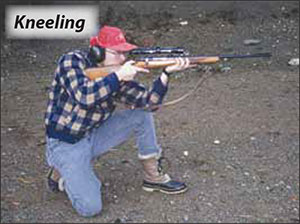 Taking up the kneeling position is simple and quick. Holding the rifle in the two-handed or “ready” carry with the forestock in your left hand and the pistol grip in the right, take a comfortable step towards the target with your left (target) foot. Turn your rear foot out at a 45-degree angle and kneel on your right (non -target) knee. Ensure you allow your right foot to bend at the toes, forcing your boot to take up your weight. Do not open your ankle so your toes point to the rear. This will put excess strain on your ankle and create an unstable tripod. Now that your knee is on the ground, sit down on the heel of your right (non-target) foot, placing most of your weight onto that foot (now you see why you make your boot take up your weight). Slide your left (target) foot forward until it is ahead of your left (target) knee. Raise the rifle and rest your left elbow on your left knee, ensuring again that your elbow is in the notch and forward of your knee joint. Then aim and shoot. The kneeling position is uncomfortable, especially for those of us with bad knees, but in the majority of the hunting situations I have encountered this is the position I shoot from. It offers a lot of clearance while still being much more stable than the off-hand position.
The Off-Hand or Standing Position:
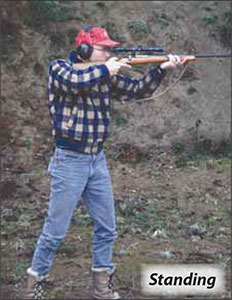 The off-hand or standing position offers the least support of all. It is wobbly and subject to all the little nuances that our muscles, nerves, and heartbeat throw at us. It is the only position that relies strictly on muscle to support the firearm. To adopt this position simply move the firearm into the “ready” carry position, step towards the target with your target foot and turn your rear foot out about 45 degrees. Raise the firearm to your shoulder, ensuring that your left arm is underneath the forestock and not out at a wide angle. Your right arm should be nearly parallel to the ground. Bend your left (target) knee just enough to feel it unlock, and lean forward just enough to adjust your center of balance slightly to the front. This is called “leaning into the shot” and places your body mass behind the recoil, preventing the muzzle from rising during the recoil and the shot from going high. Many individuals like to move their left (non-trigger) hand back towards the receiver and rest their upper arm against their chest. This is wrong and should not be practiced. If you try it you will immediately notice that not only do your sights rise and fall with your breathing, but they also jiggle with every heartbeat as well as shifting your bodyweight backwards. The off-hand position offers the greatest clearance for a shooter. Unfortunately, it is the least stable and therefore the least accurate, yet is by far the position most often employed in the field. This is usually because the shooter is in a hurry and simply doesn’t think to adopt a more stable position, or they don’t want to get dirty or wet.
Many times when hunting, the animal you’re after has already spotted you and is heading for the nearest bush. In that case an off-hand shot may very well be your only choice. Should you end up in this unenviable position, there is a way to stabilize yourself. If you are near a tree, use it as a support. Like shooting from a rest, ensure you place your hand between the rifle and the tree and lean forward, taking up some of your weight on the left arm. You’ll be surprised at how much steadier this is compared to the standard off-hand position.
You can do yourself and your quarry a big favour by learning these positions and putting them into practice. By adopting the most stable position for the situation you will consistently shoot more accurately and your clean kill ratio will climb significantly. That means more meat in the freezer and fewer wounded animals in the field and that just makes good sense.


