

Every year I plan the flies for Fly of the Month for the year. One of the things I hear when I am on the water is what are you using. This year I will share with you my flies that I use, and how to fish them. Enjoy…
For fly anglers winter fly fishing can be the most rewarding season of the year. If you can stand a little rain and cold, you can have the river or lake to yourself in most cases. One of the best part of winter fishing is most of the activity is around 11am to 3pm on a sunny day, or all day on a gray day, without too much wind. Aquatic insects move a little more when things warm up a bit and so do the trout. Enjoy the day, and pick a day where it is comfortable to be on the water or in it, remember to dress in many light layers and try to find another crazy fisherman to join you.
Another great reason to get out and fish between January and March, is it can be one of the most technically challenging times of the year to catch trout, demanding precision and skill more than any other time. If you are successful now, you can catch trout any time of the year.
When water temperatures drop; trout metabolisms slow down and they become lethargic, they don’t chase flies as when the water temperature is between 45 to 65 degrees. Rivers are usually at their lowest and clearest in midwinter and in some areas snow-covered banks reflect light and exaggerate shadows more. Under these conditions, I try to slow my pace and movements down, being concerned about my position with the lower winter sun, I try not to cast long shadows over the runs. My winter fishing wardrobe demands duller, darker colors, more than any other season, as I want to blend into the surroundings.
When it comes to casting, I slow down here too, I enjoy ever cast. I’m patient, and pause between repeat casts. I try not to flog the water. When it comes to stripping in my fly I use slow, strips instead of the longer ones I have used in the summer. I also down-size my tippet. I normally fish with 4X tippet Rio Fluorocarbon, but I drop down to 5X. I think the light and shadow contrast on bright winter days, added to the low clear water is a recipe for making trout more tippet shy, and when I am fishing with a strike indicator, I don’t go big, I prefer to use small pieces of yarn or pinch-on foam.
Smaller flies are my fly of choice, these are nymphs and midges. These insects are typically much smaller (size16 or smaller) and I have found that small black flies work the best. Tans, browns, and greens also tend to work well, but black is my go to color. When it comes to weighted flies I like to use black tungsten beads. I will start with an un-weighted fly and then change my weight a couple of times before I even think about changing my fly pattern. Have fun as this opens up an opportunity to catch fish in every month of the year.
Frenchie
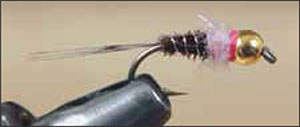 Very similar to a Pheasant Tail nymph, but this particular fly will out produce just about any other fly from my experience. It is not so much an exact imitation of an insect but more so a general representation of a large amount of insects. This is key to the productiveness of this fly pattern. It primarily consists of a pheasant tail body with an Ice Pink dubbing and gold colored tungsten bead. Add to that by tying this with a pink thread to create a pink hot spot near the bead. I’ll typically fish a size 16, but depending on how the fish like it I may switch to a size 18 for the more finicky ones. (Created by Lance Egan)
Bead: 7/64 Gold or Copper Tungsten
Weight: .015 lead free wire
Thread: UNI-Kevlar Ultra Pink
Tail: Coq De Leon Hackle
Rib: Copper Small Wire
Body: Pheasant Tail
Collar: Ice Dub UV Pink
Tying Instructions
Start by mashing down the barb of your hook, insert the hook point into the bead small hole first. Take eight wraps of wire around the hook shank and break off. Add a drop of Zap-A-Gap cement to the hook shank and then push wire into the bead base. Wrap thread in behind lead, advance the thread forward over wire to the bead and back rearward to insure the weight stays in place. Add eight or 10 pheasant tail fibers, snip the tips off square, tie in tips first, secure them behind your lead wrap. Wrap to base of tail, then wrap forward to behind the bead. Should have a gently tapered underbody.
Add copper wire to the side of the hook. Counter wrap the copper wire to form a rib, end behind bead. Do a thread wrap over the wire to prevent the wire un-wrapping at the head of the bead, this changes the wrap direction to be the same as the wire. After two wraps of the thread, wrap the thread around the wire to change direction again and secure in the wire back to normal direction. This makes for a very durable fly. Dub pink ice dubbing on your thread. After wrapping, make a thread collar. Whip finish. Secure head cement to thread to help durability. Let dry, add second drop of head cement.
Zebra Midge
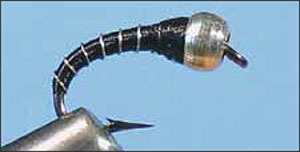 I find one of the best flies for the winter is the Zebra Midge. When the water turns cooler, the majority of mayflies and caddisflies cease activity, which leaves the midge as the trout’s go-to meal. Pound-for-pound in the ecosystem, midges make up the main food source. The Zebra Midge is simple and sparse by design. It is nothing more than a thread body of varying colors, and I like it best with a tungsten bead. The bead is the secret. Tungsten sinks three times quicker than brass, and that added density is great in low flows allowing you to use less split shot. Carry this fly in olive, black, and red colors and you will be well rewarded
Bead: 1/16 Tungsten Silver
Thread: UNI-Kevlar Ultra Black
Rib: Extra-Small Silver Wire
Tying Instructions
Slide bead onto the hook, insert the hook point into the bead small hole first. Tie in thread behind bead. Tie in the silver wire and insert one end of the wire into the bead opening and start looking at the hook in thirds. Cover 1/3 with thread. Wrap the thread back up to the bead and wrap it back up again 2/3, wrap it down to the bend of the hook then back to behind bead. Spin your bobbin counter clockwise, this will relax the twist in the thread and flatten out your thread. Wrap thread backwards to bend of hook, continuing to spin the bobbin to relax the thread, this will give you a smooth body as you move up and down the fly body. End behind bead, then spin your bobbin clockwise to give your thread a round diameter again. Spiral wrap the wire over the body giving equal spacing between wraps. Tie it in behind the bead and wrap in front and behind wire to secure. Build up thread “a cone” behind the head. Whip finish and head cement. ![]()


