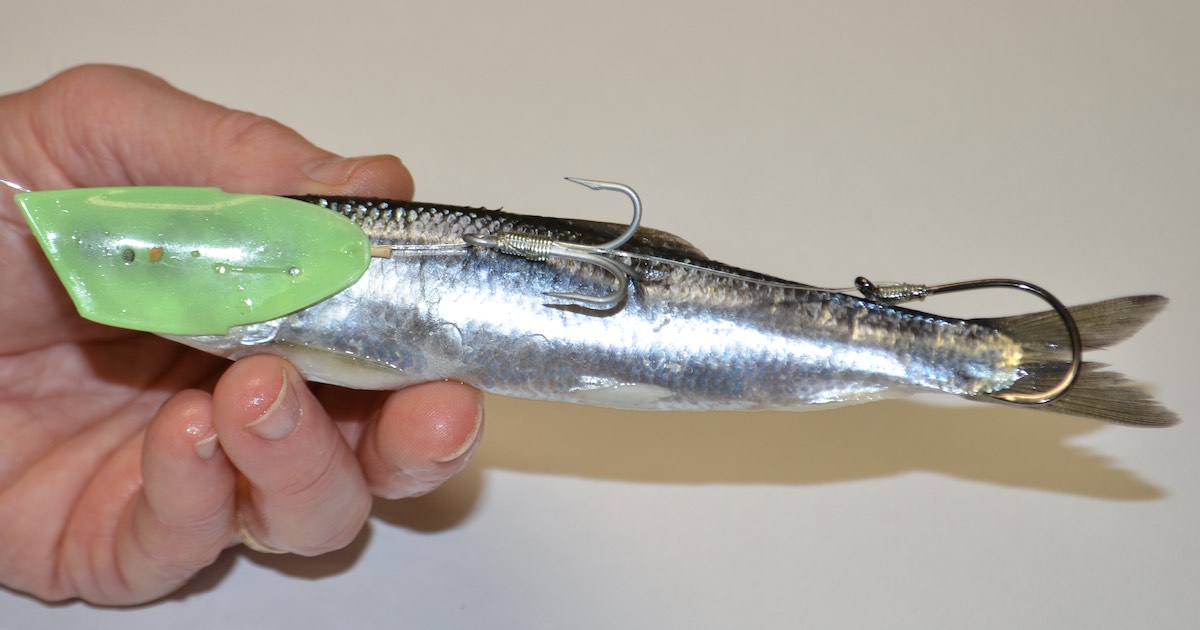
The Rhys Davis Super Herring Special Teaser Head works best with blue (7” to 8”) herring. The bait can be brined or fresh.
Insert the head of the herring into the teaser head (the top of the herring should line up with the long flat part of the teaser head), and attach it using a round toothpick inserted through the hole in one side of the teaser head and out through the hole in the other side.
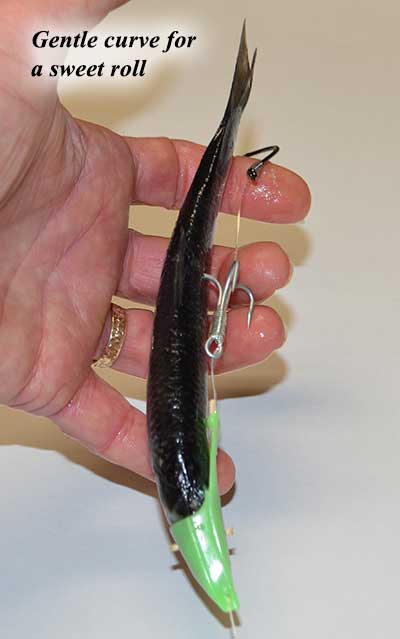
Use a pliers to clip off the toothpick, leaving it protrude about an eighth of an inch. Don’t snap it off, as often the toothpick will break inside the Teaser Head and will not be secure. Place one point of the treble deep into the herring on the side above the lateral line at the leading edge of the dorsal fin. Carefully curve the herring in a smooth arc towards the treble hook. The leader runs through two holes in the Teaser Head. Tighten up on the line to keep the herring in the curved shape (I like a very gentle curve), using the toothpick to maintain tension. The single hook should trail freely, either even with or slightly behind the tail of the herring.
It is important that the side of the Teaser Head at the tensioning toothpick be tight against the herring. Any gap here will cause problems with the roll.
The normal roll as described above works beautifully with a flasher. When I fish without a flasher, I like to bend the spine of the herring so the tail points up, and insert a round toothpick from the rear to hold it in position. This produces a roll that moves a lot more water, generating a strong acoustic signature, and is dynamite for big salmon. Note that inserting the toothpick will tilt the tail to one side. With the Rhys Davis Teaser Head it is important to insert the toothpick on the starboard side of the herring with the tail tilted slightly to the port side—this will ensure that the Teaser Head and the bend in the herring work together to roll the herring in the same direction.
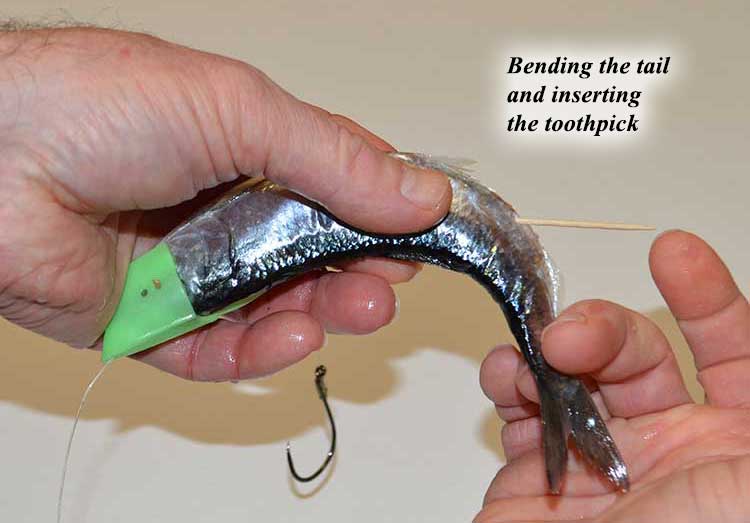
For best results the tail should be bent close to 90 degrees (this moves more water and provides a better acoustic signature). It may be necessary to gently massage the herring while bending, to prevent it from breaking.
Now place the herring in the water and check the action. It should make one or two tight turns each second with the tail following directly in line with the head like a spinning pencil, not flailing in a cone shaped pattern like a helicopter rotor. It may be necessary to adjust the curve of the herring and the tension on the treble hook to correct the roll. A very slow roll (less than one roll per second) is best for big springs, and a faster roll (perhaps two rolls per second) for coho.
The herring with Teaser Head can be fished at the same speed as the flasher/ hoochie combination, but it is usually fished slower. I like to fish my Teaser Head at about 1.5 mph. When using a flasher, it might be necessary to increase the speed to 2 mph so the flasher rotates consistently. Or just run slow and let the flasher waggle from side to side, which also works well.
A few years ago, I was guiding at Milbanke Sound on a slow afternoon, and suggested to one of my guests that he rig a flasher ahead of his Teaser Head herring. He only had the gear down a few minutes when it was hammered by a big Chinook that gave us a terrific fight. After a very exciting 30 minutes it was finally laying beside the boat when the hooks pulled out. The salmon was at the surface just out of reach and on its side gasping, a real beauty, and I estimated the weight in the mid 40s. My guest grabbed the net while I steered the boat; we chased the salmon as it slowly swam away, then recovered its strength and dove. We didn’t quite catch up to him, but it was great fun—a close encounter of the best kind. Later, as we were setting the gear again, I noticed that my guest had rigged his flasher backwards with the wide end pointing towards the boat.
This was a shocker for me, as I had always assumed that if the flasher is rigged backwards it wouldn’t work. But it actually works as a dodger, waggling back and forth but not rolling, and some salmon really like this action. It’s good practice to think outside of the box—there were about twenty-five boats fishing nearby, most running flashers, and this salmon might have been attracted to the different action and acoustic signature.
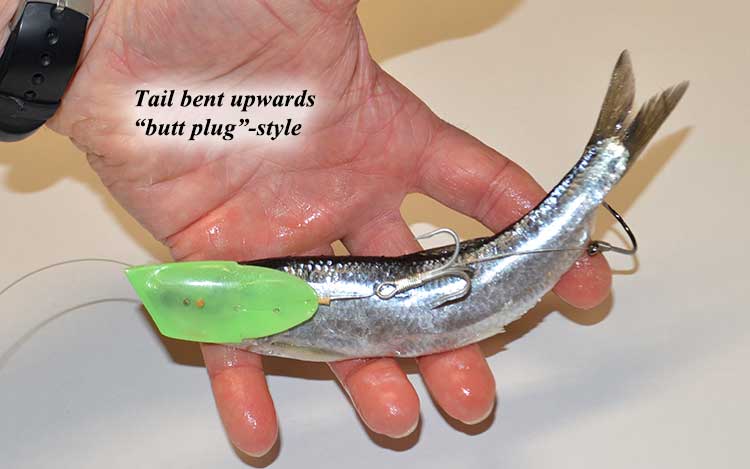
With the traditional Teaser Head rig the treble hook is critical, because one tine of the treble must be in the herring to hold it in the required curve. The other two points on the treble are sticking out, and the tips can catch on the salmon when he bites, providing a good chance of hooking the salmon. With the treble leader a very high percentage of hits turn into solid hookups.
I’ve had concerns that the treble might injure small salmon, but over the years I have seen very few bleeders. I think this is because the #1 treble hook has a relatively small gap size. In comparison, while fishing spoons with “J”-style 6/0 siwash hooks, I have seen a high percentage of bleeders among 12- to 15-lb springs, which I generally prefer to release. For this reason, I’ve changed my spoons to claw-style hooks, as the claw shape has a smaller gap and does less injury to the salmon. It also holds them better during the fight.
The toothpick that is used to tension the line will swell when wet, crushing the wood fibers. Then if it dries overnight it will shrink and become loose in the Teaser Head. It is good practice to replace the tensioning toothpick every morning, and always with a dry toothpick, which is stronger and easier to insert.
Check out Part 1 if you missed it!
Never miss an issue of Island Fisherman Magazine, Subscribe today!
Visit the Store
$34.99
$34.99
Featured Catch
Joel Unickow halibut (Photo: Rob Frawley Lucky Strike Sportfishing Tofino)
